Summer is here, the sun is blazing. In the spring, there were unusually early heat waves, and in July, temperatures reached over 95°F in much of Germany. Some communities even had to restrict the use of drinking water. So, what can we do now to ensure that our bees, for example, to which we are highly committed as a company, can still find food instead of only withered grasslands? Here is an idea that can be implemented inexpensively with just a little programming knowledge, which you are welcome to imitate!
To save drinking water, we can collect rainwater in an IBC (Intermediate Bulk Container) and use it to water our garden. This container usually holds 1,000 liters and can be obtained relatively cheaply in a used and clean condition.
Rainwater can be diverted from the downspout with a rainwater filter and fed into the IBC. For smaller roof areas, all the rain can be channeled directly from the downspout into the IBC.
But now, we also want to know what the water level in our IBC is. Can I still water today or do I have to turn off the water supply from the downpipe to keep the container from overflowing? So, I need a water level sensor.
A water level sensor
Our water level sensor is based on an ultrasonic sensor that we install above the water level in the IBC. This ultrasonic sensor emits a sound, which is inaudible to us, vertically down into the container, which is then reflected off the surface of the water (or off the bottom of the IBC). The ultrasonic sensor uses a microphone to recapture this echo and measures the time it takes for the sound to travel from the speaker back to the microphone as an echo. Since we know the speed of sound (approx. 340 meters/second), we can also easily calculate the distance the sound has traveled in this time.
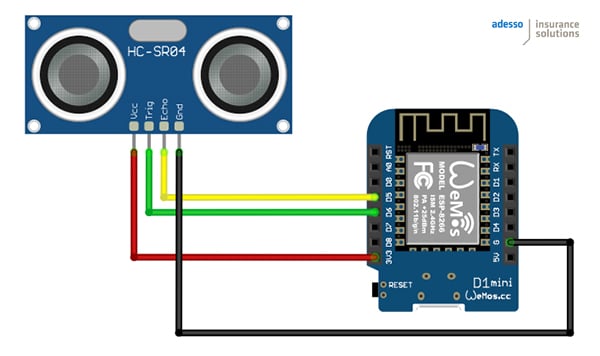
Our sensor is based on an HC-SR04 type ultrasonic sensor, which is available for less than five euros. We can control and read the sensor with an ESP8266 microcontroller board, which costs between five and ten euros. Boards of the NodeMCU or D1 Mini type come with a micro-USB port, which we can use to easily supply the board with power and also to program it. It also has a WLAN module, so we can later query our sensor via WLAN.
First, we have to properly connect the sensor to the microcontroller. The following graphic shows how this works:
Once we have the circuit ready, we can move on to programming. For programming, we use the popular Arduino IDE and the C++ programming language (click here for the code).
First, we need to define the two pins that we will use to communicate with the ultrasonic sensor. One of these is the TRIGGER_PIN, through which we can send the sound and which is connected to GPIO 12. Also, the ECHO_PIN at GPIO 14, through which the sensor signals when it has received the echo. The TRIGGER_PIN is configured as the output, the ECHO_PIN as the input.
In the distanceInMillimeters() method, we briefly set the TRIGGER_PIN on low, then on high for 10 µs, then on low again. This clear, short pulse on high starts the measurement. The sensor then reports when it has received the echo by a “high” pulse on the ECHO_PIN. The pulseIn method waits and measures the time in µs until the pulse arrives. From the measured time, we can now simply calculate the distance to the surface of the water: 340 meters/second correspond to 0.34 mm/µs and because the sound has to get there and back again, we divide the distance in half.
Now, there is always the possibility that an external effect could influence our measurement and that the sensor could deliver a wrong value. Therefore, in the measure() method, we display this measurement 11 times in a row and sort the results in an array. Element 5 of this array will be the median; we can thus ignore any higher or lower outliers.
Now, the main loop() method is very short: we display the measure()method and output the result via the Arduino IDE’s serial monitor. Because the pure distance is not very meaningful yet, we convert the detected distance into the fill level and output it.
Afterwards, we wait 5 seconds and then the game starts over again from the beginning.
Our sensor still has to be calibrated in order to calculate the correct fill level. So, we have to measure the distance when the IBC is empty and enter the value at min_distance. We also have to measure the distance when the IBC is full and enter the value at max_distance.
This programming is only a simple, initial starting point, which can be extended in various directions:
- Use of the WLAN for querying the data without cables.
- A small web server, which nicely prepares the data as a website, so the data can be easily accessed with a browser.
- Use of the MQTT protocol to actively send measurements to another server
The circuit can also be extended: the ESP8266 still has some available GPIO pins where you can connect more sensors. For example, you could add sensors to measure the temperature, humidity or air pressure.
Even if only a small contribution: with the occasional heavy rains that fall between the dry, hot days, it is good if at least some of the water is not fed from the roof directly into the sewer system, but is held in the container and can later seep into the garden.
The sensor we built always shows us how much water is in the container. If we remember what the water level was after yesterday’s watering, we can easily know whether and how much it has rained today and whether we need to water our garden again. This way, our plants can get enough water and our bees can get enough food to produce delicious honey in the summer.
Did you know? Bees are especially close to our hearts. That’s why adesso insurance solutions has its own bee colony and supports the 2028 Project – with the goal of increasing the bee population by 10 percent within the next 10 years. And small contributions like these help to achieve this goal!